iphone – Spying, Investigative & Pubic Safety (apps)

May 13, 2015

Designed for public & personal safety, check these out.


Hushed
Gives you disposable phone numbers, so you don’t have to give out your real phone number. Includes Free Voicemail and SMS and MMS.


Sex Offender Search
Find out where sex offenders are in your neighborhood. The app uses up-to-date information from the National Sex Offender Registry.


Ear Spy: Super Hearing

A spying / listening app. Amplifies the sound around you through your phone’s microphone.

Update Warning
This app can still be detected by a spy camera/RF detector.


Callbot
Caller ID app that “finds” unknown caller’s, ID.


Mobile Patrol: Public Safety App
Powered with law enforcement agencies across the nation, it informs with safety concerns and alerts, you can use it to report crimes or find out about jail bookings, most wanted lists, sex offenders, and warrants – 24 hours a day.


VINEmobile
A mobile app version of VINE (Victim Information and Notification Everyday), the National Victim Notification Network.


Background Checks – BeenVerified
Find out detailed public information about people.


5-0 Radio Police Scanner
Local and international police scanner. One of the largest collections of live police, firefighters, aircraft, railroad, marine, emergency, and also ham radios.


Ubuntu – Creative Zen (Media Player)

December 29, 2008

Getting Creative Zen to work in Ubuntu (Intrepid)

1. Get the Amarok music player.
Using Synoptics Manager type: Amarok
click to install it and all of it’s necessary files.

Note * You will need to upgrade Amarok’s files for MP3 support. *

2. When Amarok starts for the first time,
choose the “Music” folder in your computer
for Amarok to recognize your files for transfer.

3. To configure Amarok:

click > Settings > Configure Amarok > Media Devices
click > Add Device
click > Select the plugin to use with this device
click > MTP Media Device

Note * Alot of people choose the “Creative Nomad”
selection. This WILL NOT work. Choose MTP.

4. Plug your Zen player into your computer and
Amarok recognizes it immediately. You should
see any files you have on your Zen player
in Amarok. click “Devices” tab and look.

* Remember to place your music files for transfer
into your “Music” folder. (A folder called “Music”
is used for the Zen Explorer in Windows and it
seems to recognize this folder).

Note *
For pictures and video fiiles, you need to use Gnomad 2.


Ubuntu’s Celestia (APP)

December 10, 2008

Celestia is a cool, life-like planetarium app that allows you to explore and travel throughout the solar system and even beyond the galaxy. All movement is smooth. The interface runs on using button commands, making it simple to navigate anywhere in the universe you want to visit with a click.
Celestia also offers downloads of a large catalog of stars, galaxies, planets, moons, asteroids, comets, and spacecraft and dozens of add-ons with more objects.

mathsci_celestia

INSTALLING CELESTIA

To install, bring up your Synoptics Package Manager.
Type: Celestia

The manager will bring it up. Mark it and install it.
Before installing, it will tell you the following information:

52 new packages
251 MB of extra space will be used
91.8 MB have to be downloaded

After you’re done installing, you will notice it’s not in
your menu to select. NO matter, you can call it in
your terminal (type: celestia) or add it to your menu
manually, like this:

Bring up your MAIN MENU:

System > Preferences > Main Menu

Click your Education folder.
Click: + NEW ITEM (on the upper right side)
Type in:

Type: Application
Name: Celestia
Command: usr/bin/celestia

Click OK. Now, it should be in your Education shortcuts folder
inside of your menu. (As previously mentioned, you can also
bring up Celestia to your desktop by typing: Celestia
(using your terminal).

The homepage of Celestia
logo

.

PART TWO: NAVIGATING WITH CELESTIA

The hard part is over, now you can sit back and enjoy the beautiful adventure. Here is a brief image guide to help you understand how Celestia works.

Choose a planet by pressing any button from 1-9,
[or] you can also press ENTER and typing the name.
If you want to move towards the planet you select, press G.

You can adjust TIME in space by pressing K or L to slow or speed time along.
Pressing J will reverse time, altogether.

here’s more …

cnavigation

coptions

cspaceflight


Ubuntu Thunderbird

December 9, 2008

Evolution is a fantastic mail system in Ubuntu, however,
I really like using Thunderbird. It’s simple, easy, and
doesn’t have all those frilly functions associated with it.

To get and install Thunderbird, skip the download and
type this in your terminal:

sudo app-get install thunderbird

thunderbird

After it’s installed, it will show up in your Internet shortcuts in
the Applications > Internet folder.

You can also go into your Synopsis Manager and type:
thunderbird and install it from there.

If you didn’t make Thunderbird your DEFAULT mail program after you
ran it for the first time, do this (yes, this goes for Ubuntu, also):

* Gnome (Unix/Linux): In the Gnome main menu, go to:
System > Preferences > Preferred Applications

Go to “Mail Reader” option, select “Mozilla Thunderbird”

* KDE 3.x (Unix/Linux): Open the Control Center and go to:
“Network > Email”.

Under Preferred Email Client enter:

absolute path of Thunderbird install directory/mozilla –mail


Ubuntu Desklets

December 8, 2008

Just like ObjectDock in Windows, Ubuntu has it’s own
packages that resemble it perfectly. All are free!

First, there’s Avant Window Navigator (also known as AWN).
It is similar to a MAC OS docklet.

You can get it directly through Synoptics Package Manager.

1. MENU > System > Synoptics Package Manager
2. Type in AWN and look Avant Windows Navigator.

awn

More ObjectDock-types you can use on your desktop are:

gDesklets

gdesklets

Karamba

karamba

KSmoothDock (This is closest to ObjectDock in my opinion)

ksmoothdock


Ubuntu ASCII Art

December 8, 2008

Everyone has seen it, everyone wants
their own signature in email. Here is
one, easy way to do it in Ubuntu.

This can be done inside of “The Gimp”.

1. Open an image and SAVE it.
FILE -> SAVE AS
2. From FILE TYPE menu, choose “ASCII art”
3. Choose TEXT (.txt), HTML, or other type.

Gimp automatically creates a text (txt)
with your image in ASCII (black and white).

NOTE – If you want an email sig or text sig,
the best way is to make sure your image is
black and white, and in the NEGATIVE mode.
(see pic).

Here is an example how a picture looks before I use it:

road

Here is the negative of the picture to turn it into ASCII:

road2

You also will want to make sure your image
is very small and the width is twice the size
of the height, generally. This will make the
image look more the way it should, in a TXT.
A good size (for me) has been 100×200 pixels.
Smaller images fit in the text properly.

Have fun!

catcontroller


Ubuntu FireFox Bookmarks

December 8, 2008

There have been several bugs reported with FireFox 3 regarding lost bookmarks.  Here is a way you can SAVE your bookmarks without losing any data. This works in Ubuntu or WIndows, etc.

1. Bring up your FireFox browser.

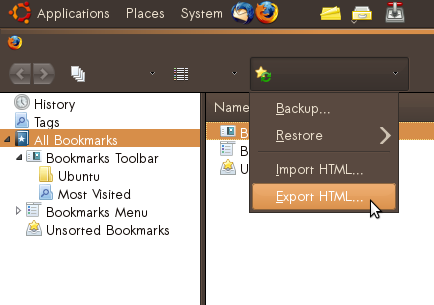
2. Go to BOOKMARKS > ORGANIZE BOOKMARKS

3. Click the STAR icon and then click EXPORT


ff2

4. Save your BOOKMARKS.html where you can find it.


ff3


Ubuntu: Using gThumb

December 7, 2008

Many people seem to be having the same problem when it
comes to losing IrfanView in Windows and switching to Ubuntu.
They keep asking, “How do I resize or crop my pictures?”

I have found (so far) that using gThumb is best.
Here is a brief tutorial using a couple basic functions in gThumb.

First, you need to have gThumb in your Applications
to choose it from your “Graphics” shortcuts.

1. Bring out Synoptic Package Manager.
2. Type in the search: gThumb
3. Tick the box and choose MARK FOR INSTALL.
Click APPLY and install it.

Now it will be in your Graphics shortcuts
in the Applications menu.

An even easier method to get gThumb is to use your Terminal.
Type: sudo app-get install gthumb

After installation, it will appear in your Graphics shortcuts in the
Applications menu.

Ok. I have a picture I want to change into a black/white
and resize it for my profile pic. Here’s how:

1. Bring out gThumb and BROWSE to a folder where
you have your picture.

2. Click on the picture you want to change.

3. While it’s highlighted, go to VIEW
Double-click on the picture to bring it up.

4. Choose what you want to change in the image.
In this case, I’m going to use DESATURATE.
This turns my picture black and white.

help1

5. Next, I choose CROP. I’m going to choose
the size and cut my picture smaller.
After I crop the picture, I choose APPLY.

help2

help3

6. Now that I have the image the way I want it,
I want to resize it smaller.
I go to IMAGE and then RESIZE.
I choose the size and click SCALE.

7. I’m happy with the picture, so I go to FILE
and choose SAVE AS.

help5


UBUNTU with WINDOWS Install

December 5, 2008

This is going to an easy set of instructions on how to install Ubuntu Linux – if you already have Windows installed.

1. Get yourself a FREE Ubuntu CD (desktop edition). Download it or have it shipped to you – your choice.

icon-ubuntu FREE Ubuntu CD (desktop edition).

2. Once you have the CD, boot into Windows and put the CD in or mount it on a virtual drive. (Yes, you can install Ubuntu on a virtual drive).

3. Choose the “Install inside of Windows” option.

ubuntucdinstall

4. Fill in the “user-name” of your choice and a password.

NOTE *
You will be using your password ALOT in Ubuntu. Choose one that’s easy for you to remember and you’re comfortable with.

Choose your language and how large of an install size you want. I recommend the 4 GB install if you’re using a laptop, and a 15 GB if you’re using a regular computer (PC). If you using Ubuntu for a game, you can choose the 30 GB install, but it’s really not necessary. Click next.

5. Ubuntu will begin the installation and create it’s backup .ISO. When it’s finished, it will reboot.

NOTE *
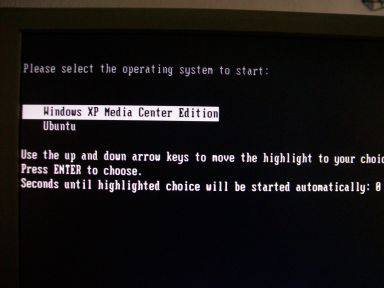
Stay where you are … the reboot will take you directly to your new dual-boot screen.
Use the arrow key on your keyboard and choose Ubuntu, so it can continue installing.
dualbootscreen

6. Ubuntu will now load itself and continue to install the Ubuntu Operating System (OS).

After it’s finished installing, it will reboot, again. Stick around so you can choose Ubuntu on the dual-boot screen, once more.

7. After rebooting, you will see the new Ubuntu login screen. Type in your user-name and password and hit ENTER.

ubuntu-logon2

Ubuntu will load your new desktop, and yes, it’s rather clean looking. No icons sitting about. Just for you.

8. Right-click your desktop and choose “change desktop background”. This will prompt your updates to appear. Click on your updates notification and choose to intall them. This will take a few minutes, so feel free to walk around while it fetches your updates and then installs them for you.

9. When your updates are finished, your computer needs to reboot. There again, wait for the dual-boot screen so you can choose to go back into Ubuntu.

That’s it! You’re finished.

Just remember you will need to use the dual-boot screen to choose (either) Windows or Ubuntu. Now, you have both Windows and Ubuntu to choose from as an OS (operating system). For further “how-to’s”, you can check back here periodically or check out the Ubuntu forums and get to know other users and newbies. Have fun!

As Lara Croft might say, “Login and begin your new adventure using Ubuntu. Feel free to look around.”

ubuntulogo4

more links

Ubuntu Linux | The Ubuntu LIVE CD | Customizing an Ubuntu LIVE CD
Ubuntu Customization Guide v2 | Using Ubuntu to Backup Files

WORD OF CAUTION

If you see the screen below, you DO NOT want to choose to install
Ubuntu unless you are partitioning your hard drive. Close this
window and run the disk from your Windows desktop, instead.

hard_disk


UBUNTU (Linux)

December 5, 2008

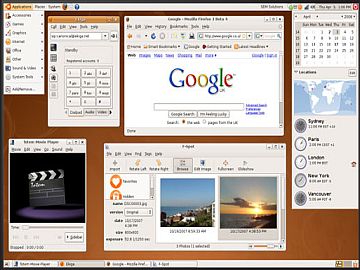
Ubuntu (as previously mentioned) is a Linux OS (operating system). It reminds you of Windows, but has it’s own unique operating system. It is a world-based community project and is FREE. It is in many languages (and growing), and is an extremely compatible, smart, and safe OS for office-web browsing-music-anything you need on your computer. It has a HUGE library of free software available that includes office suites, music players, 3D modelers, and much more.

One of the neat features of Ubuntu is the option to try it out using a “Live CD”. A “Live CD” is a play-able demo you can stick into your computer and run the operating system to check it out. You can click features and menus, move around, read documentations, watch some videos, etc. and see what you think of it.

ubuntu

Ubuntu is available for PC, 64-Bit PC, laptops and Intel based Mac architectures. At least 256 MB of RAM is required to run the alternate install CD (384MB of RAM is required to use the live CD based installer). Install requires at least 4 GB of disk space.

If you decide you’d like to move past the “Live CD” and use Ubuntu as an OS, you can install it as a typical desktop OS or you can get the Server edition, as well.
People who love and use Windows, will love Ubuntu as a second OS. If you decide you’d like to try it, you have the option to install it and use it without removing your Windows XP or Vista – which I will explain in the next post (Install Ubuntu with Windows).


The Ubuntu promise

* Ubuntu will always be free of charge, including enterprise releases and security updates.
* Ubuntu comes with full commercial support from Canonical and hundreds of companies around the world.
* Ubuntu includes the very best translations and accessibility infrastructure that the free software community has to offer.
* Ubuntu CDs contain only free software applications; we encourage you to use free and open source software, improve it and pass it on.

What does Ubuntu mean?
Ubuntu is an African word meaning ‘Humanity to others’, or ‘I am what I am because of who we all are’.

Ready to give Ubuntu a try?
Check out their website and download the free CD to your computer or order a free CD to be shipped to you. Remember, it’s not just free to download, it’s completely FREE to use and enjoy. The latest Ubuntu distro is called: Ubuntu 8.10 (Intrepid Ibex).

icon-ubuntuDownload Ubuntu

For those who wish to do the “partitioning of your hard disk” install, check this out: The Perfect Desktop – Ubuntu 8.10 (Intrepid Ibex)

more links

Ubuntu Linux | The Ubuntu LIVE CD | Customizing an Ubuntu LIVE CD
Ubuntu Customization Guide v2 | Using Ubuntu to Backup Files